Throwing Video Analysis Task

Introduction

Throwing is a fundamental movement skill essential for success in many sports and physical activities. An athlete’s ability to execute and adapt their throwing mechanics can determine their effectiveness in varied environments. Conversely, incorrect technique can hinder performance and increase injury risk.

This free lesson plan provides an in-depth analysis of throwing biomechanics, along with practical activities designed to enhance skill development through observation, assessment, and correction.


📄 Learning Objectives

  • Understand the biomechanics of throwing and its impact on performance.
  • Identify key phases of the throwing motion and their purpose.
  • Conduct a video analysis of throwing mechanics.
  • Develop corrective strategies to improve technique.
  • Apply biomechanical principles to enhance accuracy, power, and consistency.

✅ Key Components of an Effective Throwing Motion

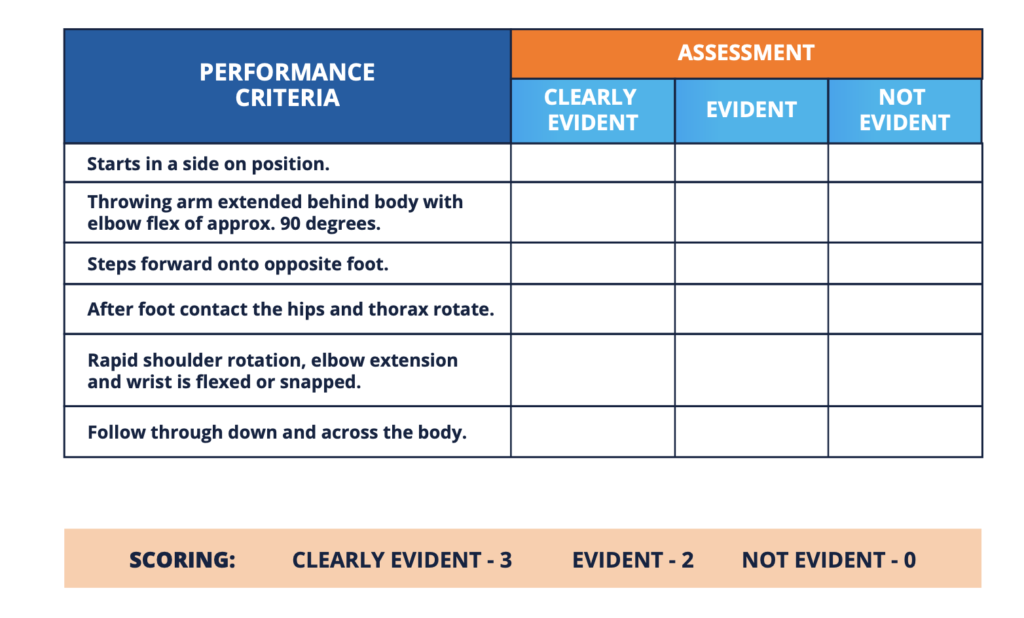
To achieve an efficient and powerful throw, athletes should demonstrate the following fundamental mechanics:

1. Stance & Preparation

  • Begin in a side-on stance for maximum rotational force.
  • Weight should be distributed evenly, with knees slightly bent.

2. Arm Positioning & Load

  • Throwing arm extended behind the body, elbow flexed at approximately 90 degrees.
  • Opposite arm should be used for balance and stability.

3. Step & Hip Rotation

  • Step forward onto the opposite foot of the throwing arm to generate momentum.
  • Initiate hip and thorax rotation to transfer force from the lower body.

4. Release Phase

  • Rapid elbow extension, shoulder rotation, and forearm pronation propel the ball forward.
  • Wrist moves from hyperextension to extension, ensuring controlled power transfer.

5. Follow-Through

  • The throwing arm moves down and across the body, allowing a fluid deceleration.
  • Proper follow-through prevents injury and maximizes accuracy.

🎯 Practical Activity: Video Analysis of Throwing Technique

Aim

  • To analyze and refine the mechanics of the throwing action using video playback.

Equipment

  • Tennis balls
  • Smartphones or tablets with video analysis apps
  • Printable assessment tables

Procedure

  1. Observe the throwing action of one or more class members.
  2. Record their throws using video analysis apps.
  3. Replay the footage in slow motion to assess movement patterns.
  4. Use the provided biomechanical framework to rate the effectiveness of each phase.
  5. Identify areas for improvement and provide corrective feedback.

Suggested Apps for Video Analysis

  • CoachNow (iOS & Android)
  • Hudl Technique
  • Video Delay Instant Replay

📊 Discussion & Reflection

1. Biomechanical Breakdown

  • Why is a side-on stance important for maximizing force generation?
  • How does hip rotation contribute to throwing velocity?
  • Why is the wrist snap crucial for accuracy?
  • What is the role of force summation in throwing performance?

2. Performance Assessment

  • Rate the subject(s) observed with a score out of 18 based on:
    • Stance & balance
    • Arm positioning
    • Hip & thorax rotation
    • Release mechanics
    • Follow-through effectiveness

3. Identifying Weaknesses & Solutions

  • Which phase(s) of the skill did the subject struggle with the most?
  • Suggest biomechanical adjustments to improve efficiency and accuracy.
  • Justify recommendations using scientific principles of motion.

📥 Download the Full Throwing Analysis Unit (Free PDF)

Want the complete lesson plan with activity sheets and assessment rubrics?

👉 Download the Throwing Unit PDF

(This structured resource was previously members-only but is now free for all PE educators!)


✨ Explore More PE Resources

Enjoyed this lesson? Check out our PE Resource Library for more free lesson plans and activities!

👉 Access More Free PE Resources

(For exclusive coaching materials and advanced resources, explore our membership portal!)